originally posted at http://www.mrhollisterphoto.com/stream-table.html, updated 1/8/16, reposted with permission
How to Make a Great Recirculating Stream Table on the Cheap (Less than $50)
DIY Stream Table Time Lapse [youtube]
DIY Stream Table Profile [youtube]
Original Post
I tend to get frustrated when science supply companies charge teachers like myself obscene prices for what turns out to be simplistic and often flimsy lab equipment. When I was a new teacher in need of stream tables for my fledgling geoscience classes, I had my school pony-up $100 a pop for what I thought were going to be awesome stream tables (I mean, for $100 they must be awesome, right??) They turned out to be nothing more than long plastic troughs that were designed to have buckets poured over them while draining to the grass! Not exactly what I had envisioned. Necessity led me to modify those first tables by adding pumps, sumps and tubing. Those tables have worked quite well for the past ten years but are now showing their age (and I'm still mad that $5 worth of plastic cost our school $400, not to mention the pumps I had to buy out of pocket).
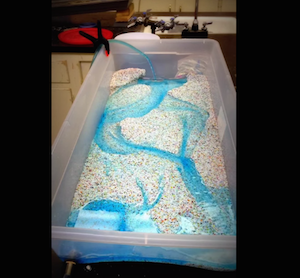
Fast-forward 10 years and geoscience classes have exploded in popularity on my campus. We now offer something like 17 sections with five different teachers. Sharing four stream tables amongst all of us wasn't going to cut-it so I decided to try my hand at making a cheap, DIY recirculating stream table from easily accessible off-the-shelf parts. As you can see from the videos above it works quite well. They have an unexpected benefit in that stream channel profiles and sediment transport are easily viewed through the transparent sides.
Fluvial geomorphology made easy! An entire class set of six would cost less than $300!! Instructions & parts follow.
UPDATE 1/8/16
The shorter 33" boxes didn't work as well as I'd hoped. I could only squeeze-in two meanders *and* the plastic had so little friction that the "groundwater" in the models would actually lubricate the sand grains and cause massive slope failures at shallow gradients. I found a 44" long Sterilite Box at Target the other day and decided to try it out using Monterey Beach Sand. It works pretty well as the new time-lapse video will show. I still have to solve the lack of friction problem, but I think that can be achieved with a piece of felt hot glued to the bottom.
Parts
Hunt around for the best deals. The prices I list are for brand new parts. If you're like me you may already have most of the stuff lying around the garage which would then make this project REALLY cheap! I ordered the tubing and pump from Amazon Prime. I got the Sterlite box at Walmart and everything else at Orchard Supply Hardware. I would recommend making four or more tables at once so you can buy in bulk and shave-off a few more bucks.
|
Putting it Together
[note: see photos for each step at http://www.mrhollisterphoto.com/stream-table.html]
- Mark a small dot on one of the corners of the tub where you want the drain to go. Try to keep it about 3/8" above the bottom.
- Heat a screwdriver or something metal with a flame. We'll use this to melt our initial hole.
- Poke the hot screwdriver into the tub at your drain mark.
- Use a pre-heated hot-glue gun to enlarge the hole. Use the nipple to check the fit of the hole. It should be very snug, almost too small.
- Scrape-away the melted shrapnel with a knife. You want a nice, flat surface for washers to sit against to prevent leaks.
- Insert the nipple with more length sticking out of the box than in it.
- Add rubber washers to both sides of the nipple and make them sit flush on the plastic tub wall.
- Screw-on the brass lock nuts. Hand-tighten with as much possible force.
- Cut-off a four foot length of tubing.
- From the 4' section of tubing, cut off a small 3" piece of tubing. We'll be making 90 degree turn in out outlet hose to promote smoother draining.
- Insert the elbow between the two pieces.
- Attach the short end of the hose to the drain.
- Zip-tie that puppy on so you never have a surprise artesian well in class.
- Cut a small square of nylon window screen. We'll attach this over the drain to be our screen to prevent any large clogs.
- Attach the screen over the drain using the rubber band. UPDATE: zip ties work better.
- How the clamp attaches the hose to the stream table.
- The final set-up. The remaining tubing is attached to the pump. The pump is set in a holding tank of your design (bucket, tupperware, whatever holds 2+ gallons). The hose from the pump is held in the stream table using the cheap clamps. The drain tube is held in the holding tank by a cheap clamp. You may need to siphon the outlet hose to get it going. Fill the table with sand/clay and you're good to go! (I used plastic medium from EM River).